Qamel - Build Desktop Application Using Go and QML (8/2/19)
This post is an introduction for Qamel, a QML binding for Go that I created. It's released under MIT license and available here.
When building a modern desktop application, the first thing that come to the mind is Electron or NW.js. Both of them are based on Chromium and using Node.js. Thanks to this, creating desktop app in Electron and NW.js feels really familiar, as if building a normal web app. This means we get all benefits of creating web app in desktop, for example :
- fast GUI prototyping;
- consistent look across platforms;
- easy styling thanks to CSS and JS;
- huge libraries to use and choose.
In other hand, since both of them are based on Chromium, they are quite heavy to use. It uses lot of memories, even when it’s only running and not used. It might be fine for some apps or games (e.g. VS Code, CrossCode), however it might be overkill for the simpler apps.
After looking around for a while, I learn about QML. QML (Qt Modeling Language) is a user interface specification and programming language, which allows developer to create a performant and flexible GUI. I believe it's a good alternative for Electron and NW.js, because :
- its syntax is similar with JSON, which make it feels familiar to web developer;
- it supports JavaScript up to ES7 for dynamic property and expressions. It means we can keep using some JavaScript library for our QML app;
- styling is quite easy with QML and it looks consistent across platforms;
- there are supports for component separation, which make the code more manageable.
As its name implies, QML is part of Qt framework which uses C++ language. Unfortunately, I'm more comfortable using Go language instead of C++, so I need a binding for QML in Go. There are several bindings that already exist, however one of them is not maintained anymore while the others are released under LGPL license, which doesn't work for my job.
With that said, I decided to create my own QML binding named qamel and released it under MIT license. It's still work in progress, but it's stable enough for my job, so I decided to share it here. However, since I only have access to Linux and Windows machine, I'm not sure if it will works in Mac OS. If you don't mind, go ahead and try it.
qamelis still work in progress and hasn't been tested on Mac OS.
I'm using Qt 5.12.0 and Windows 64-bit for this tutorial. Hopefully it's easy enough to follow in other operating system.
Installing Qt and Qamel
Before we start, make sure Go already installed on your system.
First of all, install qamel to your system by running :
go get -u -v github.com/RadhiFadlillah/qamel/qamel
go get -u -d -v github.com/RadhiFadlillah/qamel
Wait until the installation finished. Once finished, you can run qamel --help to check :
$ qamel -h
qamel is tools and binding for creating GUI app in Go using Qt + QML

Usage:
  qamel [command]

Available Commands:
  build       Build QML app
  docker      Build QML app using Docker image
  help        Help about any command
  profile     Manage profiles for QML's binding

Flags:
  -h, --help   help for qamel

Use "qamel [command] --help" for more information about a command.
If it's error with message like "qamel: command not found", make sure
$GOPATH/binis accessible from your$PATH, because that's whereqamelwill be installed.
Next, install Qt on your system. If you are on Linux, make sure the required dependencies already installed on your system. Download the official installer and follow along the steps. In this tutorial, I will install it to C:\Qt\Qt5.12.0.
When asked to choose Qt's components to install, make sure to choose at least one of Qt5 version. In Windows, I recommend you to install at least these :
Qt
├── Qt 5.12.0
|   ├── MinGW 7.3.0 64-bit
|   ├── Qt Charts
|   └── Qt Data Visualization
└── Tools
    ├── Qt Creator 4.8.0
    └── MinGW 7.3.0 64-bit
If you are using Linux, I recommend to install these components :
Qt
├── Qt 5.12.0
|   ├── Desktop gcc 64-bit
|   ├── Qt Charts
|   └── Qt Data Visualization
└── Tools
    └── Qt Creator 4.8.0
Once Qt installed, we need to set up a profile for qamel to use. Do it by running :
qamel profile setup
The command above will ask you to submit the information about your OS, build mode, and path to the Qt that you've installed before. Once finished, it should look like this :
$ qamel profile setup
Thanks for using qamel, QML's binding for Go.

Please specify the target OS for this profile. Possible values are "windows", "linux" and "darwin".
Keep it empty to use your system OS.

Target OS (default windows) : windows

Please specify the target architecture for this profile. Possible values are "386" and "amd64".
Keep it empty to use your system architecture.

Target arch (default amd64) : amd64

Please specify whether this profile used to build static or shared app.

Use static mode (y/n, default n) : n

Please specify the *full path* to your Qt's tools directory.
This might be different depending on your platform or your target. For example, in Linux with Qt 5.11.1, the tools are located in $HOME/Qt5.11.1/5.11.1/gcc_64/bin/

Qt tools dir : C:\Qt\Qt5.12.0\5.12.0\mingw73_64\bin
qmake        : found
moc          : found
rcc          : found

Please specify the *full path* to your compiler.
Keep it empty to use the default compiler on your system.

C compiler (default gcc.exe)   : C:\Qt\Qt5.12.0\Tools\mingw730_64\bin\gcc.exe
C++ compiler (default g++.exe) : C:\Qt\Qt5.12.0\Tools\mingw730_64\bin\g++.exe
Objdump (default objdump.exe)  : C:\Qt\Qt5.12.0\Tools\mingw730_64\bin\objdump.exe

Since you are targeting Windows, you might want to set icon for your executable file. To do so, please specify the *full path* to windres on your system. It's usually located in the directory where MinGW is installed.

Path to windres : C:\Qt\Qt5.12.0\Tools\mingw730_64\bin\windres.exe

Generating some code for binding...done
Saving profile default...done

Setup finished.
Now you can get started on your own QML app.
To check your saved profile, run qamel profile print :
$ qamel profile print
Details of profile default
OS      : windows
Arch    : amd64
Static  : false
Qmake   : C:\Qt\Qt5.12.0\5.12.0\mingw73_64\bin\qmake.exe
Moc     : C:\Qt\Qt5.12.0\5.12.0\mingw73_64\bin\moc.exe
Rcc     : C:\Qt\Qt5.12.0\5.12.0\mingw73_64\bin\rcc.exe
Gcc     : C:\Qt\Qt5.12.0\Tools\mingw730_64\bin\gcc.exe
G++     : C:\Qt\Qt5.12.0\Tools\mingw730_64\bin\g++.exe
Objdump : C:\Qt\Qt5.12.0\Tools\mingw730_64\bin\objdump.exe
Windres : C:\Qt\Qt5.12.0\Tools\mingw730_64\bin\windres.exe
Creating Hello World App
Let's make a simple hello world app to see the basics of writing QML app on Go. First, create a directory in GOPATH for your application. For example, we will create $GOPATH/src/desktop-app. Next, populate the directory so it looks like this :
$GOPATH/src/desktop-app/
├── main.go
└── res/
    └── main.qml
- File
main.gois the file for our Go's main function. This is the main body and where we will declare our app. - Directory
resis used to hold all resources that will be used in your app. It can be anything like QML files, images, fonts, JS scripts, etc. - File
res/main.qmlis our main QML file. This is our main view that will be shown when the app is started.
Next, open res/main.qml then write following codes :
import QtQuick 2.12

Rectangle {
    color: "cyan"

    Text {
        anchors.fill: parent
        text: "Hello World"
        font.pixelSize: 32
        font.weight: Font.Bold
        verticalAlignment: Text.AlignVCenter
        horizontalAlignment: Text.AlignHCenter
    }
}
The code above will create a Rectangle as the base of the view. Inside that Rectangle, we put a Text with caption "Hello World" that filled its parent.
Next, open main.go and write following lines :
package main

import (
	"go/build"
	"os"
	fp "path/filepath"

	"github.com/RadhiFadlillah/qamel"
)

func main() {
	// Create QT app
	app := qamel.NewApplication(len(os.Args), os.Args)
	app.SetApplicationDisplayName("Desktop App")

	// Define path to resource directory
	gopath := build.Default.GOPATH
	resDir := fp.Join(gopath, "src", "desktop-app", "res")

	// Create viewer
	view := qamel.NewViewer()
	view.SetSource(fp.Join(resDir, "main.qml"))
	view.SetResizeMode(qamel.SizeRootObjectToView)
	view.SetHeight(300)
	view.SetWidth(400)
	view.ShowNormal()

	// Watch change in resource dir
	go view.WatchResourceDir(resDir)

	// Exec app
	app.Exec()
}
So, from these lines, the application will do several things :
- First it will make the application and set its title to "Desktop App".
- Then it will create the viewer with size 400x300 pixels, and set its source to
res/main.qmlthat we created before. The viewer will keeping watch on any change inside the resource directory. When a new files is added or changed, the viewer will reload itself to show the new changes. - At last, once all ready, it will execute, and our app will be run.
Now, since the codes are ready, we will build the app. To do that, open terminal inside your project directory, then run :
qamel build -o output/desktop-app.exe --copy-deps
Command above will build the app and save it as output/desktop-app.exe. The --copy-deps flag means all of Qt's libraries that our app use will be included to the same directory as the output path. So, it's recommended to set output path to its own directory, or else your project directory will be filled with its dependencies.
If all goes well, the build process should be finished with output like this :
$ qamel build -o output/desktop-app.exe --copy-deps
Starting build process.

Load config file...done
Removing old build files...done
Generating binding files...done
Generating Qt resource file...done
Generating syso file...icon file doesn't exist
Generating code for QML objects...done
Building app...done
Copying dependencies...done

Build finished succesfully.
Now, run the app and it should look like this :
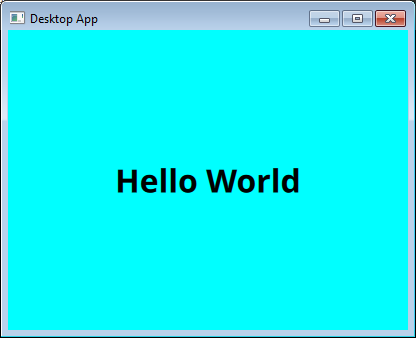
While the app still running, try to make some change in the res/main.qml and save it. For example, change the color to red. The app's UI should be updated automatically after you save the change.
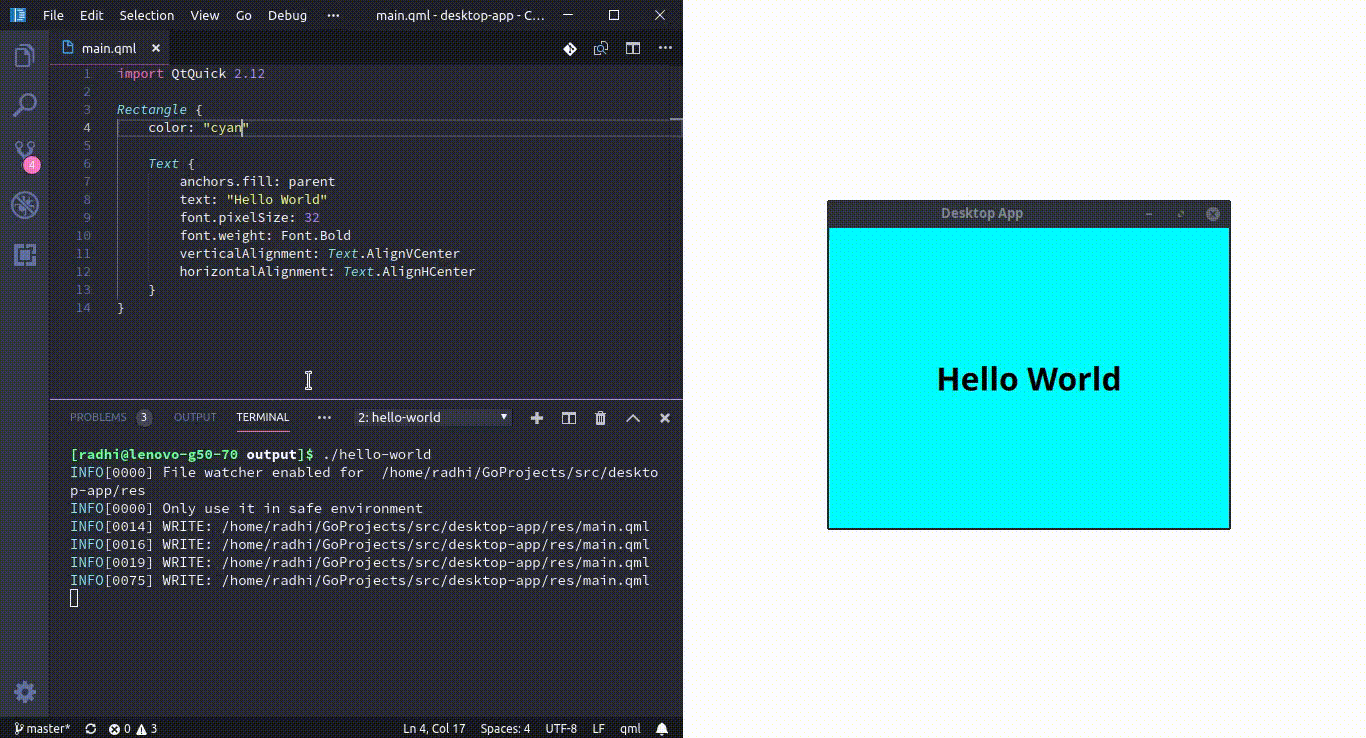
The screencast above is recorded in Linux because my Windows VM is too slow to handle screen recording. It should be similar though.
Deploying the Application
Say you've finished creating a QML application and want to deploy it to public. Before releasing it, you have to modify some codes in main.go file, to make sure it's ready for deployment.
First, set the source for your QamelViewer to use qrc path. This is done to make sure your app uses QML file that embedded on your executable binary. This way, no matter where you put it, your app will keep on displaying the correct QML view. To do it replace this line :
view.SetSource(fp.Join(resDir, "main.qml"))
and change it into :
view.SetSource("qrc:/res/main.qml")
Second, you have to disable file watcher for your viewer. To do so, you need to remove this line :
go view.WatchResourceDir(resDir)
Now, the final code for main.go should look like this :
package main

import (
	"os"

	"github.com/RadhiFadlillah/qamel"
)

func main() {
	// Create QT app
	app := qamel.NewApplication(len(os.Args), os.Args)
	app.SetApplicationDisplayName("Desktop App")

	// Create viewer
	view := qamel.NewViewer()
	view.SetSource("qrc:/res/main.qml")
	view.SetResizeMode(qamel.SizeRootObjectToView)
	view.SetHeight(300)
	view.SetWidth(400)
	view.ShowNormal()

	// Exec app
	app.Exec()
}
Now you can build your app like usual, and share it to other people.
Cross Compiling Application
Sometimes we need to deploy our application statically or to other platform. Unfortunately, Qt that installed from official installer only supports building app for the same platform as where the Qt is installed. So, if you are using Windows and want to compile a Linux binary, you need to run a virtual machine and run Qt from there, which is quite annoying to do.
The official installer also only supports dynamic linking, so if you want to build a static app, you need to build Qt manually. And, since Qt is a huge library, it take a really long time to build it. In my case, it took almost three hours to build static Qt in Linux.
To avoid this issue, qamel supports cross compiling application using Docker image. All you need to do is to install Docker to your system, then build your app using qamel docker.
For example, if you are in Linux and want to build your app for Windows 64-bit, you need to open your project's directory from terminal, then run :
qamel docker win64 -o output/win64/desktop-app.exe --copy-deps
Or, if you want to build it statically, you can run :
qamel docker win64-static -o output/win64/desktop-app-static.exe
There are several Docker targets available, which can be seen by running qamel docker -h :
Build QML app using Docker image.
Possible values are "linux", "linux-static", "win32", "win32-static", "win64" and "win64-static".

Usage:
  qamel docker [target] [flags]

Flags:
      --copy-deps       copy dependencies for app with dynamic linking
  -h, --help            help for docker
  -o, --output string   location for executable file
  -t, --tags strings    space-separated list of build tags to satisfied during the build
What Next
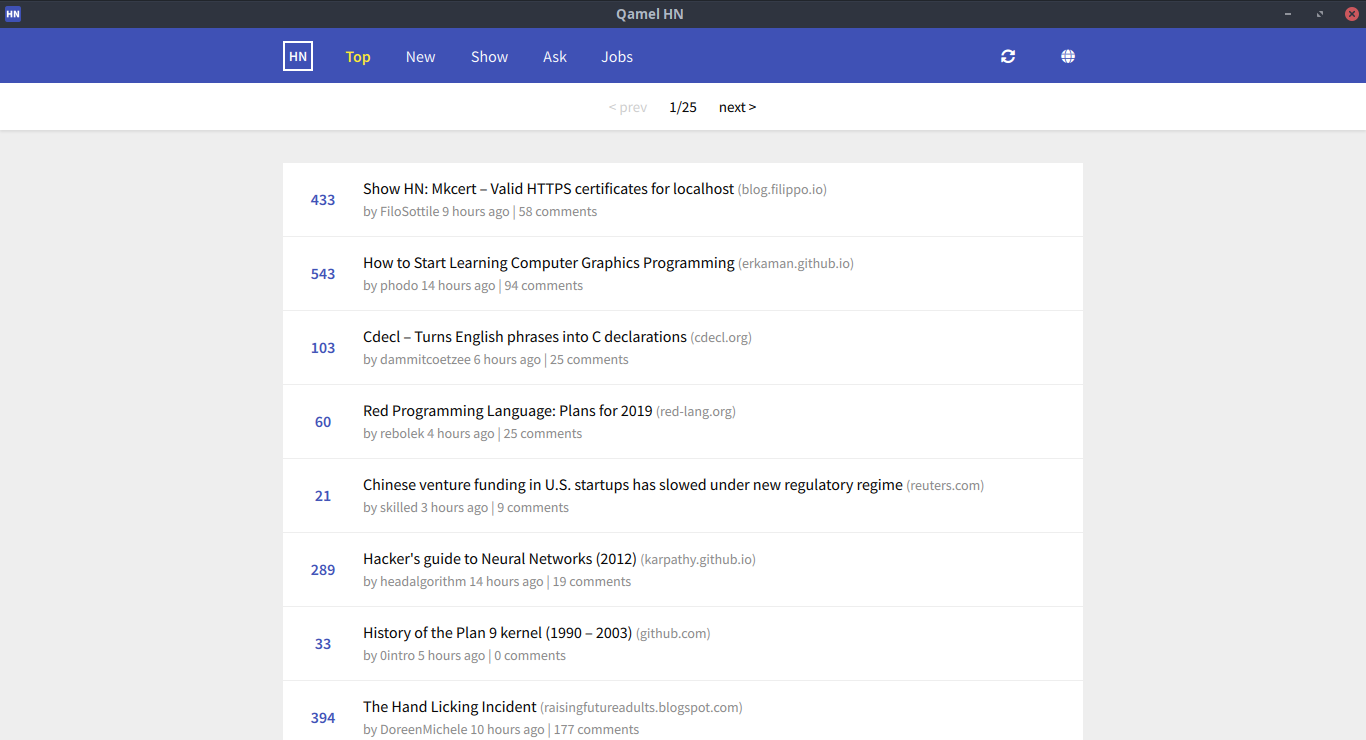
For more detailed documentation about qamel, you can check godoc and wiki. For a more advanced demo, I've made a simple HackerNews reader built using Qamel, which available here.
Conclusions
Right now Electron and NW.js almost become the standard for building a desktop application. Sure there are some cons from using them, like heavy memory usage and battery drain. However, the fact that it's easy to use, flexible to style, consistent across platform, and has huge JS ecosystem make the pros outweight the cons.
Unfortunately, in my job I asked to built a desktop app for retail, and the PC that used by company is quite old and has low specs (it uses Celeron processor and 2 GB RAM, which is quite small for modern standard). Sure Electron still works there, but not as snappy as I and the boss hoped. So, I decided to make this binding.
If you are constrained with low spec device like me, or you only need to built a simple app, I hope qamel can be an alternative for you.